
Outdoor Smart Lights Placement for Safer, Better Nights

Discover the best outdoor smart light placement ideas to improve safety, boost security, and create a more inviting outdoor space after dark.

Many homes mount outdoor smart lights where trim looks easy in daylight, then find steps still dark and porches too bright at night. Placement should follow how people move after dark, because the wrong spots waste money and leave real hazards hard to see. This guide covers night paths, roofline and porch length, driveway and step priorities, power routing, zones, and long-term care.
Table of Contents
Map Night Paths for Outdoor Smart Lights Before You Choose Length
Estimate Roofline and Porch Length Without Buying Short
Set Safety Priorities for Driveways, Steps, and Side Paths
Plan Power Controllers and Hidden Cable Routes
Use Zones for Daily Holiday and Security Lighting
Check IP Ratings, Temperature Exposure, and Long-Term Care
Conclusion
Map Night Paths for Outdoor Smart Lights Before You Choose Length
Most outdoor smart lighting placement mistakes start with a daylight sketch. Eaves look clean, porch beams look obvious, and the driveway feels familiar. At night, the order changes. A single step near the side door may matter more than a perfectly lit gable.
Walk the property after dark before you order anything. Start at the street or driveway, move toward the front door, then repeat the route from the garage, side gate, backyard path, trash area, and deck. Do not only look for dark areas. Notice where your pace slows, where guests would hesitate, and where a wall or fence could carry a soft wash of light across the walking surface.
Mark the route in three layers.
Movement points include driveway edges, steps, gates, side paths, and routes from the garage to the door.
House framing points include rooflines, porch beams, fascia, columns, and patio edges.
Power points include outdoor outlets, sheltered adapter spots, controller placement, and the direction of the first cable run.
Walk the route before you order. If the night path shows the side steps are the weak point, do not spend the whole budget on roofline color scenes. If the porch is already bright, the better upgrade may be a softer trim run and clearer driveway guidance.
Estimate Roofline and Porch Length Without Buying Short
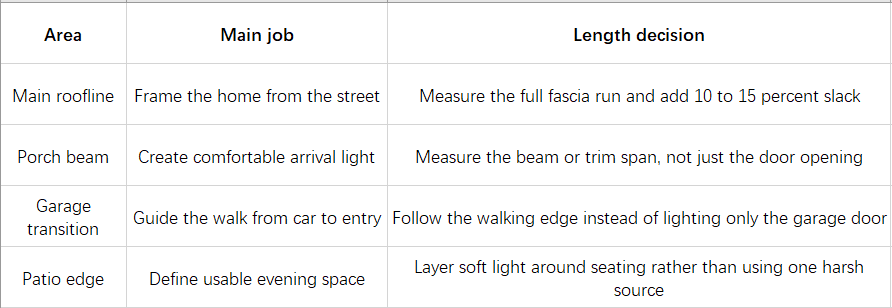
Length planning comes after the night path map because the route tells you which architectural lines deserve lights. For rooflines, measure the exact fascia or eave sections you want to follow, not the rough width of the house from the curb. Corners, small returns, garage breaks, and controller placement can eat more length than expected.
Add 10 to 15 percent slack for turns, end positioning, and small alignment corrections. If a product comes in set lengths, round up rather than trying to stretch a run to the last inch. A slightly longer run can often be managed with cleaner placement. A short run usually leaves an awkward dark gap near the end.
On a porch, measure the beam, ceiling edge, or trim line that will actually hold the lights. Do not base the estimate on door width alone. People stand at the lock, wait for guests, pick up packages, and move sideways around railings. The light should support that whole small area, not only the center of the door.
Before you order permanent outdoor lights, use this quick planning table.
If run length or color control still feels unclear, browse the eufy smart LED lights first. You can compare outdoor run options, smart control, and color setups without working from one SKU page.
Set Safety Priorities for Driveways, Steps, and Side Paths
Roofline lights make the home look finished, but safety lighting belongs where feet actually move. This is where the earlier night walk matters. It separates attractive trim lighting from the zones that keep people from guessing at edges.
Start with height changes. Steps, thresholds, uneven pavers, and curb edges should read clearly from the direction people approach. A step that looks visible from the street can still disappear when someone comes from the driveway side. Test both approaches if your home has more than one entry route.
Driveways come next. The goal is guidance, not glare. Place light along the walking edge, garage side, low wall, or nearby surface where it can show the route from car door to porch. For open stretches with no wall to wash, plan roughly one light point every 6 to 10 feet along the walking line, then adjust for brightness and sightlines.
On a narrow side path, steady wall washing along siding or a fence usually reads better than scattered ground fixtures, because the surface reflects light across the walkway. Service runs to side gates, trash areas, decks, and the backyard can follow the same rule: enough steady light to read the path, not a scatter of bright spots.
Last, check dark corners near doors or garages. A route can feel unfinished when the last few feet before the entry still fall into shadow.
Plan Power Controllers and Hidden Cable Routes
Power planning should happen before the first clip goes up. The first cable direction often decides whether the finished installation looks intentional or like an outdoor extension cord project. Stand near the chosen outlet and trace the route to the first light segment with your hand before mounting. The outlet should support the full run without stretched cords or exposed indoor extension cables.
Keep adapters and controllers in sheltered positions whenever possible, but still reachable for pairing, reset, and inspection. A light strip may have a strong outdoor rating, but that does not mean every connector, controller, and plug should sit under roof runoff. Under eaves, behind trim, or inside a suitable outdoor-rated enclosure is usually a better place for power hardware than a low wall where rainwater collects. Coil any extra length neatly in a sheltered spot, not where water can pool.
Cable hiding should follow existing lines. Fascia edges, gutter shadows, porch beams, siding seams, and trim returns can conceal a run without making future inspection impossible. Route cables away from puddles, downspout discharge, sharp trim edges, and pinch points. Avoid routes that cross open walls diagonally unless conduit or a raceway is part of the design. If you need a new outlet, hardwired work, or changes near wet locations, check local electrical rules first.
For broader install planning, the eufy outdoor lighting gives a useful view of outdoor options by scene, including roofline, pathway, holiday, and everyday lighting needs.
Use Zones for Daily Holiday and Security Lighting
After the physical route is clear, divide the smart outdoor lighting setup into zones before you think about colors. This is what keeps one installation useful in normal weeks, not just during holidays. A good zone plan lets the porch stay warm, the steps stay clearer, and the roofline shift for events without forcing one brightness level across the whole house.
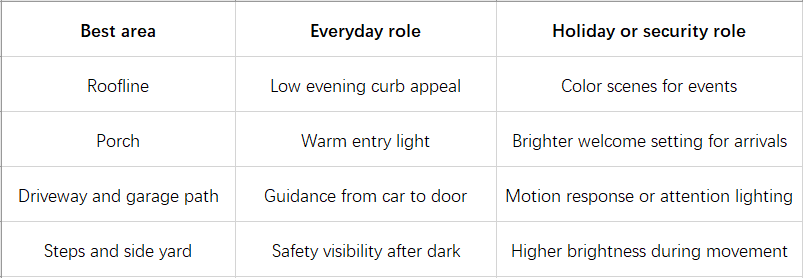
The value is control. Daily lighting can stay low and warm. Steps and driveway zones can use clearer white light when people are moving. Holiday scenes can stay on the roofline and porch instead of washing every side path in saturated color. If your system links with cameras or motion detection, a side entry can brighten when activity is detected while the rest of the house stays calm.
If your zone map splits roofline, porch, driveway, and steps, eufy Permanent Outdoor Lights S4 (200 ft with 144 LED Lights) lets you set different looks for each area from a single install. RGB with warm and cool white from 1500K to 9000K can keep the roofline low for evening curb appeal, warm the porch for arrivals, and brighten steps with clearer white when people move, while holiday color stays on trim instead of side paths. A radar sensor covers 120° and up to 12 m, which suits driveway or side-entry zones that need to respond to movement. IP67 waterproofing helps the strip handle rain and splashes on fascia and porch runs, so the same zone setup holds up through wet seasons with less upkeep. Matter also lets you adjust daily brightness and color through Apple Home, Google Home, or Alexa.
Check IP Ratings, Temperature Exposure, and Long-Term Care
Outdoor lighting still lives outdoors after the first week. Rain, dust, UV, ice, heat, insects, and small cable shifts all matter. Check the IP rating for the light string, controller, adapter, and any sensor rather than assuming the whole system shares one rating. Even high-rated parts need sensible routing and sheltered placement.
IP protection does not make up for poor routing. Avoid low points where connectors sit in standing water. Keep controllers and adapters away from direct roof runoff. Leave enough slack for expansion and contraction because heat and cold can pull on clips, adhesive, and cable bends over time.
Temperature also changes how an install behaves. In hot climates, dark trim and direct sun can stress adhesive and plastic parts. In cold climates, freeze and thaw cycles can loosen clips or make tight cable bends more brittle. Follow the product manual for operating temperature limits, and use screws or recommended mechanical fasteners where the manufacturer calls for them.
Set a simple maintenance rhythm.
After the first week: check whether any section has sagged, shifted, or pulled tight around a corner.
After severe weather: inspect connectors, clips, controller placement, and cable routes near gutters.
Twice a year: wipe visible lenses or covers, remove debris, and confirm zones still match how your household uses the space.
Before holiday scenes: test daily white settings first so decorative colors do not hide steps or driveway edges.
The final test should happen at night. Stand in the street to judge the roofline, then stand in the doorway to judge the porch, driveway, side path, and steps. If the house looks festive, but the walking route is still unclear, lower the decorative zone and strengthen the safety zone.
Conclusion
The cleanest outdoor smart light placement starts with a night path map. Walk the route first, measure roofline and porch runs with slack, protect the driveway and steps before chasing color effects, then route power and cables where they can survive weather and still be inspected. Set zones for daily light, holidays, and security, so one install can look good from the curb and still keep steps and paths readable at night.


Comments