15 Under Bar Storage Ideas for a Neater Bar Setup
- Sophia Mitchell

- Dec 19, 2025
- 9 min read
Organize your bar with 15 clever under-bar storage ideas. From pull-out drawers to hanging racks, maximize space efficiently!
Ever find yourself frantically searching for that bottle opener while guests wait for their drinks? Your under-bar area doesn't have to be a chaotic black hole where bar tools disappear forever! Think of the space beneath your bar as prime real estate that's currently sitting vacant while paying zero rent. Just like a well-organized toolbox makes a mechanic's job easier, smart under-bar storage transforms your bartending experience from frustrating fumbles to smooth, professional service. Whether you're running a home bar that hosts weekend gatherings or designing a commercial space serving hundreds daily, the area below your bar top holds incredible potential for organization and efficiency. From pull-out shelving systems that bring everything to your fingertips to vertical dividers that keep glassware pristine, these storage solutions eliminate clutter while putting every tool exactly where you need it. Ready to transform that wasted cavity into a perfectly organized command center? Let's dive into storage ideas that'll have you mixing drinks like a pro while keeping everything neat, accessible, and Instagram-worthy!
1. Install Pull-Out Drawer Systems
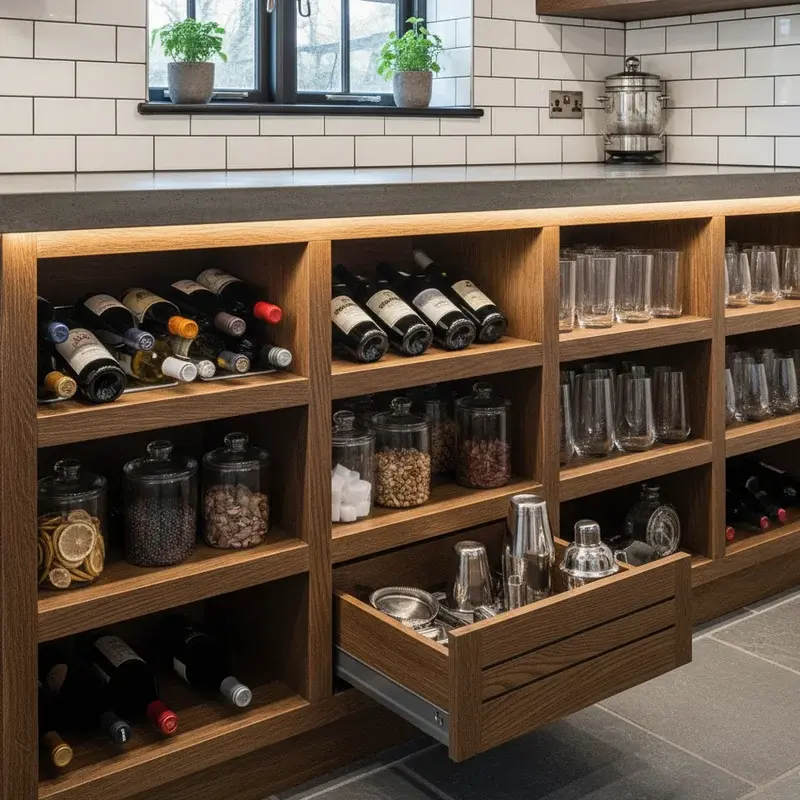
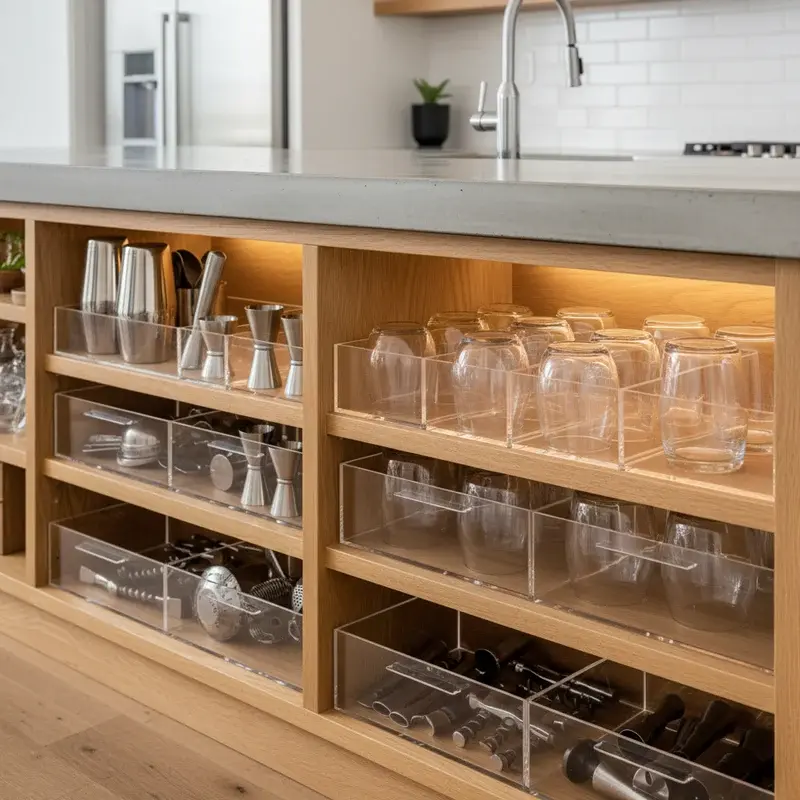
Transform your under-bar chaos into organized bliss by installing pull-out drawer systems bringing everything forward for easy access without awkward bending. Heavy-duty glides support substantial weight from bottles, mixers, and equipment while operating smoothly through thousands of opening cycles. Customize drawer heights accommodating various items from tall bottles to flat bar tools. Soft-close mechanisms prevent slamming, protecting glassware and maintaining peaceful environments during busy service. Add dividers within drawers creating designated spots for specific tools, preventing items from sliding around. Install shallow drawers up high for frequently used tools and deeper drawers below for backup supplies and bulk items. Choose drawer fronts matching your bar's aesthetic, from sleek stainless steel to warm wood tones. Your pull-out system eliminates the dreaded "reach into the dark cabinet" situation, making inventory checks and restocking incredibly efficient.

2. Add Vertical Bottle Dividers
Prevent bottle domino disasters by installing vertical dividers creating individual slots keeping liquor bottles upright, organized, and instantly accessible. Custom-cut dividers accommodate standard 750ml bottles while adjustable systems adapt to various sizes from miniatures to magnums. Space dividers appropriately allowing bottles to slide in and out smoothly without binding. Use materials like wood, acrylic, or metal matching your bar's design aesthetic. Label each slot indicating which spirit belongs where, training new bartenders efficiently and maintaining organization during busy rushes. Angled dividers provide better visibility of labels from above, speeding up bottle selection. Removable dividers allow reconfiguration as your bottle collection evolves. Your vertical organization system prevents bottles from hiding behind each other, eliminates time wasted searching, and dramatically reduces the risk of accidentally grabbing the wrong spirit mid-cocktail.

3. Create Custom Glass Racks
Protect your glassware investment while maximizing vertical space by building custom racks holding glasses securely in designated spots preventing chips and breakage. Design racks with properly sized compartments for different glass types: rocks glasses, highballs, wine glasses, and specialty cocktail vessels. Add cushioning materials like cork or rubber preventing glass-on-wood contact that causes scratches and chips. Install racks at heights allowing easy removal and replacement without awkward reaching or dangerous overhead lifting. Slope racks slightly downward preventing dust accumulation inside stored glasses. Use transparent materials or open designs allowing quick visual inventory checks. Include drainage considerations if storing freshly washed glasses. Stack-able designs accommodate growing collections without complete redesigns. Your custom glass racks transform fragile glassware from anxiety-inducing hazards into organized, protected assets ready for immediate use.
4. Build Tiered Shelf Organizers
Maximize vertical space by installing tiered shelving systems creating multiple levels of storage within single cabinet depths, essentially doubling or tripling capacity. Step-style organizers place items at varying heights making everything visible and accessible simultaneously. Use tiered systems for backup supplies, mixers, and garnish containers keeping frequently used items forward and reserves behind. Adjustable tiers adapt to changing inventory needs throughout seasons or menu changes. Choose materials resisting moisture and easy to clean since under-bar areas experience spills inevitably. Install LED strip lighting under each tier illuminating contents for quick identification in dim bar environments. Consider pull-out tiered systems combining benefits of drawers with tiered organization. Your tiered shelving eliminates the frustration of items hiding in back corners, reduces overstocking because you actually see what you have, and keeps your bar operation running smoothly even during rush periods.

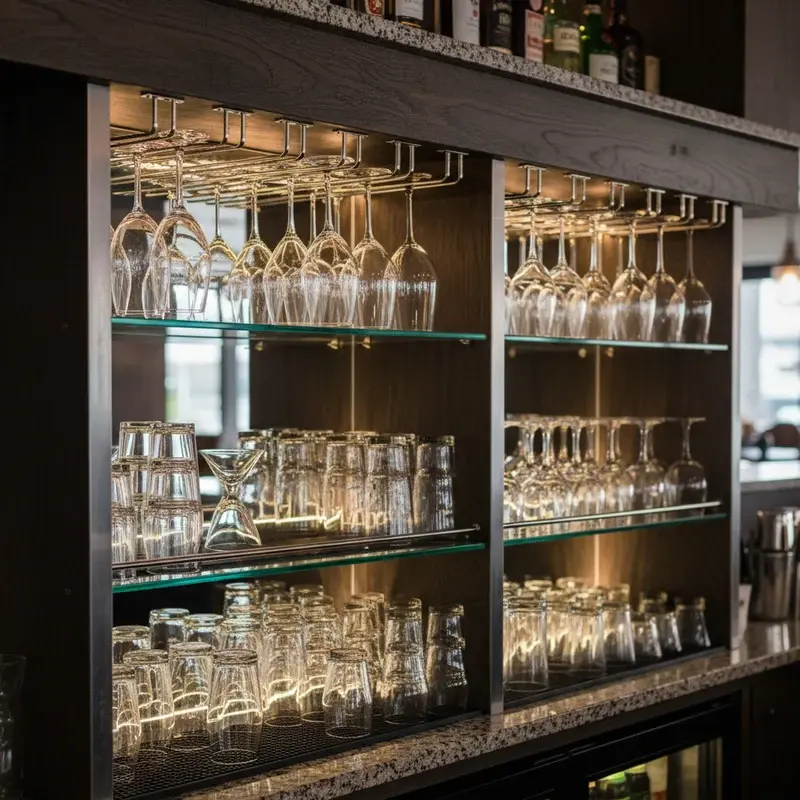
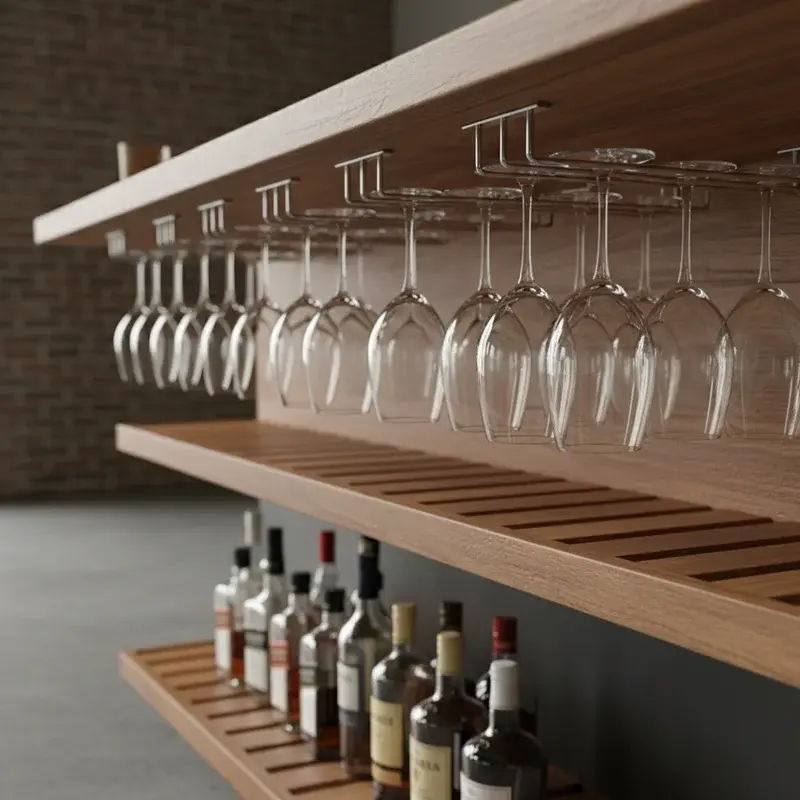
5. Install Hanging Stemware Holders
Free up valuable shelf space by installing overhead stemware racks suspending wine glasses, champagne flutes, and martini glasses from their bases elegantly and efficiently. Position racks at comfortable heights preventing head bumps while allowing easy glass retrieval with simple pulling motions. Space slots appropriately preventing glasses from touching and potentially chipping. Choose between fixed racks for permanent installations or track systems allowing position adjustments. Ensure proper mounting into solid structure supporting glass weight plus safety margin. Polished chrome, brass, or wood finishes match various bar aesthetics from industrial to traditional. Consider double-row systems maximizing storage capacity in limited spaces. Add cushioning bumpers preventing metal-on-glass contact. Your hanging stemware solution showcases beautiful glasses attractively, keeps them dust-free by storing them upside down, and makes grabbing the right glass during busy service absolutely effortless.
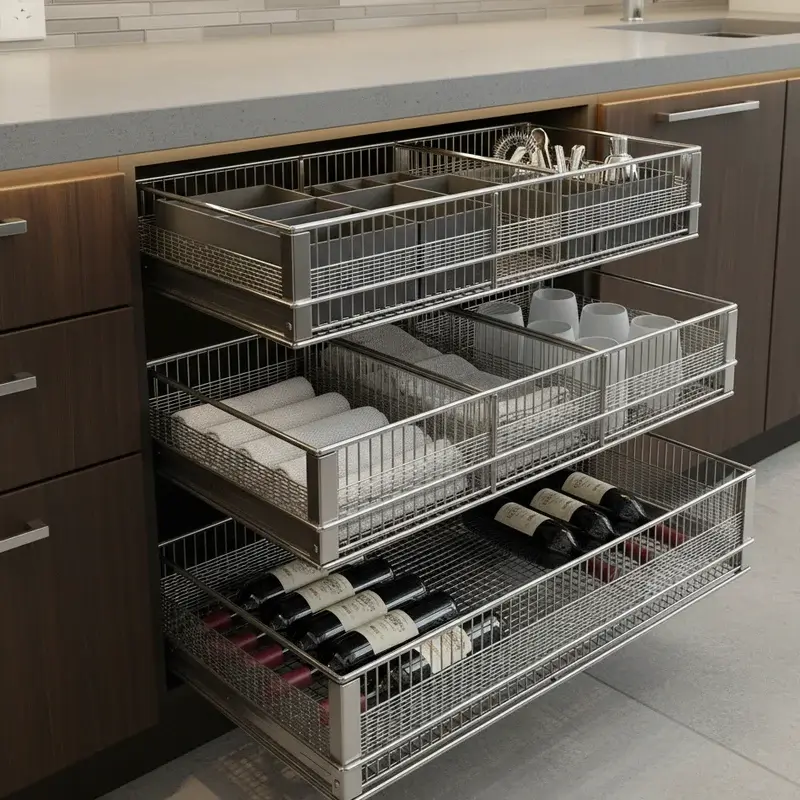
6. Design Sliding Basket Systems
Embrace flexible storage by installing wire or mesh basket systems sliding on tracks, providing visibility and ventilation while organizing diverse bar supplies. Baskets accommodate irregularly shaped items that don't fit neatly in drawers or on shelves. Choose rust-resistant materials like stainless steel or coated wire withstanding humid bar environments. Different basket sizes organize various categories: small baskets for garnish tools, medium for napkins and straws, large for towels and cleaning supplies. Label basket fronts clearly ensuring everything returns to proper locations. Easy removal allows carrying baskets directly to restocking areas or cleaning stations. Ventilated construction prevents moisture buildup keeping stored items fresh and mold-free. Stack multiple baskets vertically maximizing space efficiency. Your sliding basket system delivers commercial kitchen functionality to home bars while maintaining visual organization even in open-style bar designs.
7. Add Magnetic Strip Tool Holders
Harness magnetic power by installing strong magnetic strips holding metal bar tools securely while displaying them attractively for instant access and visual appeal. Mount strips at convenient heights inside cabinet doors or along interior walls keeping tools visible yet protected. Stainless steel strips blend seamlessly with modern bar aesthetics while providing substantial holding power. Organize tools logically: openers together, jiggers grouped, strainers clustered. Magnetic storage eliminates rummaging through drawers mid-service. Tools air-dry naturally preventing moisture buildup causing rust or odors. Add multiple strips at varying heights accommodating different tool lengths. Include small magnetic containers holding tiny items like bottle pourers or cocktail picks. Your magnetic system keeps expensive bar tools from getting lost, damaged, or forgotten at the bottom of cluttered drawers while creating visually satisfying organization that feels professional.

8. Create Divided Compartment Trays
Bring order to small items by installing divided trays organizing garnish picks, pourers, straws, napkins, and other miscellaneous essentials into designated compartments preventing chaotic mixing. Custom-build trays fitting your specific drawer dimensions perfectly, eliminating wasted space. Use waterproof materials like plastic or sealed wood withstanding inevitable spills. Removable dividers allow reconfiguration as inventory needs change seasonally. Label compartments for training purposes and maintaining organization through staff changes. Choose shallow trays for frequently accessed items and deeper ones for bulk supplies. Nest similar items within compartments: all citrus tools together, all stirrers grouped. Include small compartments for oddities like cocktail umbrellas or specialty garnish items used occasionally. Your compartment system eliminates the junk drawer syndrome, speeds up service by putting everything in predictable locations, and makes inventory management ridiculously simple.
9. Install Under-Counter Wine Racks
Dedicate proper storage to wine bottles by building specialized racks beneath your bar maintaining proper storage angles while keeping selections accessible and organized. Horizontal storage keeps corks moist preventing oxidation and spoilage. Design racks accommodating standard 750ml bottles with slight spacing allowing air circulation. Include sections for different wine types: reds, whites, sparklings. Modular systems expand as collections grow without complete overhauls. Choose materials complementing your bar aesthetic: rustic wood, modern metal, or classic wrought iron. Position racks away from heat sources and vibration from refrigeration units. Add small chalkboard labels identifying wine varieties or vintages. Consider climate control in warm environments protecting wine investment. Your dedicated wine storage protects bottles properly while showcasing your collection, making wine service professional and ensuring every bottle remains at optimal quality.

10. Build Roll-Out Trash Systems
Maintain cleanliness efficiently by installing pull-out trash and recycling bins keeping waste management discrete yet immediately accessible during busy service periods. Multiple compartments allow separating trash, recycling, glass, and compost following environmental practices. Heavy-duty slides support substantial weight from full bins operating smoothly. Choose appropriate sizes balancing capacity with comfortable lifting weight for disposal. Add lid systems containing odors and preventing fruit flies. Position bins strategically near preparation areas minimizing steps during service. Include liner holders keeping replacement bags handy. Consider bins with foot pedals allowing hands-free operation during messy tasks. Removable inner bins simplify emptying and cleaning. Your organized waste system maintains sanitary conditions, speeds up cleaning processes, demonstrates environmental responsibility, and eliminates unsightly trash cans cluttering your bar area during service.

11. Add Adjustable Shelving Units
Create adaptable storage by installing shelving systems with adjustable heights accommodating changing inventory needs and various product sizes throughout seasons and menu updates. Commercial-grade standards and brackets support heavy loads from bottles and equipment. Space adjustment holes closely allowing precise height customization. Use deep shelves for bulk supplies and shallow ones for frequently accessed items. Choose materials resisting moisture and easy to clean like coated wire or sealed wood. Add shelf liners preventing items from sliding and reducing noise. Install shelves at ergonomic heights reducing bending and reaching strain. Include toe-kick space at bottom allowing comfortable standing positions. Label shelf edges indicating intended contents maintaining organization. Your adjustable system eliminates the frustration of fixed shelving that doesn't quite fit your needs, adapts as your bar evolves, and maximizes every cubic inch of valuable under-bar real estate.

12. Create Towel Bar Storage
Designate proper storage for bar towels by installing multiple bars or hooks keeping clean towels accessible while providing drying space for damp ones used during service. Position bars at convenient heights allowing single-hand grabbing without looking. Install sufficient quantity accommodating your towel rotation needs during busy periods. Use rust-resistant materials like stainless steel or coated wire withstanding humid environments. Separate clean and used towel areas preventing cross-contamination. Add color-coded systems: white for glassware, dark for spills. Include clips or magnets preventing towels from falling during movement behind the bar. Consider retractable bars maximizing space when not needed. Position near sinks and preparation areas minimizing drips across floors. Your organized towel system eliminates the pile of damp towels accumulating on counters, maintains sanitary conditions, and keeps your bar looking professional rather than like a locker room.

13. Install Door-Mounted Organizers
Maximize every surface by adding organizational systems to cabinet door interiors, transforming wasted space into functional storage for frequently accessed items and tools. Over-the-door racks hold cleaning supplies, extra pourers, or backup tools. Magnetic strips mounted inside doors keep metal tools organized and accessible. Pocket organizers store cocktail recipe cards, order pads, or garnish picks. Hooks hold aprons, towels, or small utensils. Choose low-profile systems preventing interference with door closing and shelf access. Ensure proper weight distribution preventing door hinge stress. Use clear organizers allowing visual inventory without opening doors. Position items strategically: heavy items low, frequently used items at eye level. Your door-mounted storage adds capacity without sacrificing shelf space, keeps small items from getting lost, and makes smart use of surfaces typically ignored completely.

14. Design Lazy Susan Turntables
Eliminate corner cabinet black holes by installing rotating platforms bringing back-corner items forward with simple spins, making everything equally accessible regardless of position. Choose sizes fitting your cabinet dimensions while allowing rotation clearance. Heavy-duty bearings support substantial weight rotating smoothly under load. Use multiple smaller turntables rather than single large ones allowing category organization. Position frequently rotated items on easily accessible turntables. Add raised edges preventing items from falling during rotation. Consider two-tier lazy Susans doubling vertical capacity. Label sections indicating contents maintaining organization. Use in both corner cabinets and standard ones improving accessibility. Choose materials matching your style: classic wood, modern acrylic, or industrial metal. Your rotating storage eliminates items getting permanently lost in corners, reduces time searching for supplies, and makes restocking dramatically easier and faster.

15. Build Appliance Garages
Create dedicated housing for countertop equipment by building enclosed storage spaces keeping blenders, juicers, and other appliances protected yet quickly accessible when needed. Design garages with electrical outlets inside allowing appliances to remain plugged in ready for immediate use. Install roll-up doors, sliding panels, or hinged fronts based on space and aesthetic preferences. Include ventilation preventing heat buildup from motors. Size garages accommodating specific appliances with slight clearance for easy removal. Add pull-out platforms bringing heavy appliances forward eliminating awkward lifting. Include cord management systems preventing tangled messes. Choose door materials and finishes matching your bar aesthetic seamlessly. Consider appliances' usage frequency: daily items get premium accessible spots. Your appliance garage maintains clean countertop surfaces, protects expensive equipment from damage and dust, and keeps your bar looking organized rather than cluttered even when fully stocked.

Conclusion
Transforming your under-bar area from cluttered chaos to organized efficiency dramatically improves both functionality and professionalism. These 15 storage solutions accommodate varying budgets, space constraints, and organizational preferences ensuring every bartender finds suitable options. Whether implementing comprehensive systems or starting with simple improvements, prioritize accessibility and logical organization matching your specific workflow patterns. Remember, the best storage solutions work with your natural habits rather than against them, creating sustainable organization.
FAQs
Q1: What's the most cost-effective under-bar storage solution?
A: Divided compartment trays and door-mounted organizers deliver excellent organization at minimal cost with easy installation.
Q2: How deep should under-bar shelving be?
A: Standard 12-16 inch depth accommodates most bottles and supplies while maintaining comfortable reach and visibility.
Q3: What materials work best for humid bar environments?
A: Stainless steel, coated wire, sealed wood, and marine-grade materials resist moisture damage and maintain longevity.
Q4: How can I organize a very small under-bar area?
A: Vertical dividers, hanging racks, and door-mounted organizers maximize limited space by utilizing all available surfaces.
Q5: Should I organize by item type or frequency of use?
A: Combine both strategies: frequently used items at optimal heights, then organize by category within zones.


Comments